
HSEBox Server Installation Guide
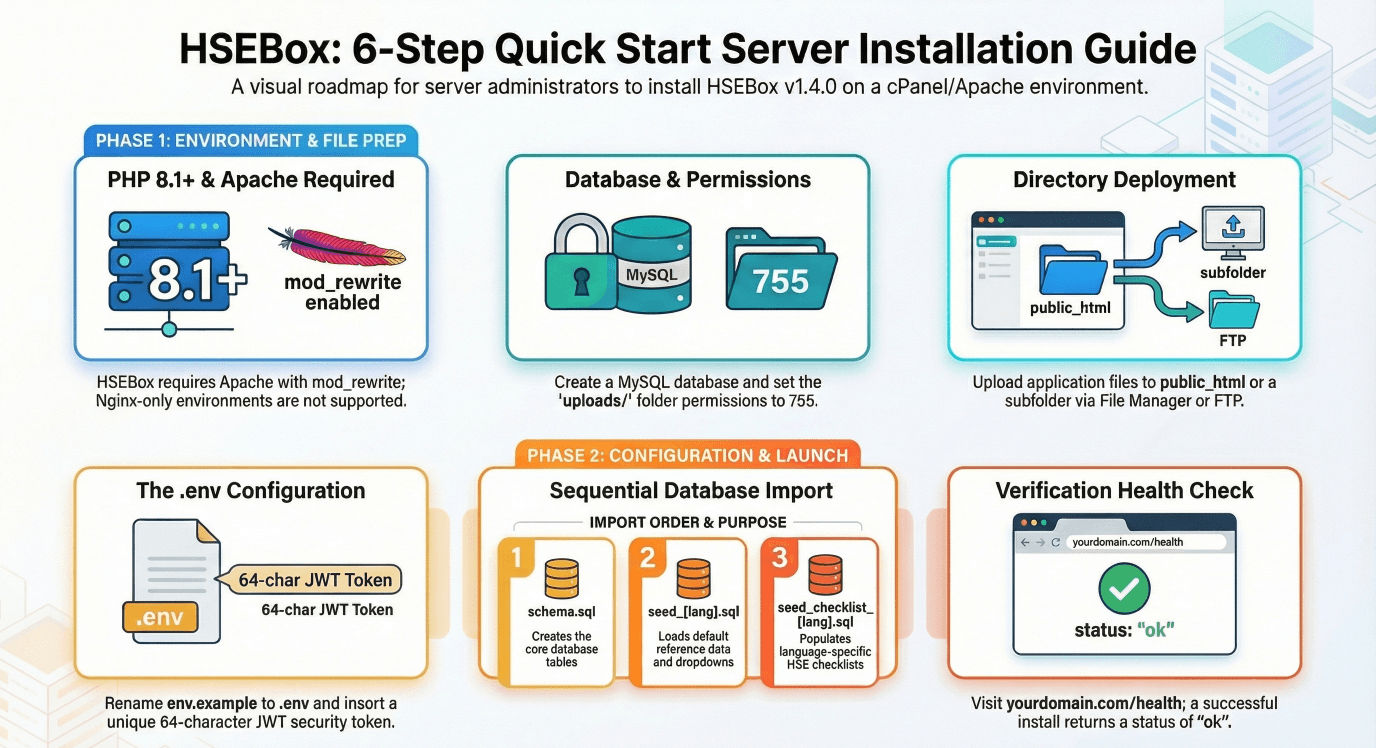
📋 Before You Begin — Minimum Requirements
Your hosting must meet these requirements:
| Requirement | Minimum | Recommended |
|---|---|---|
| Hosting type | cPanel shared hosting or Apache server | cPanel with SSH access |
| PHP version | 8.1 | 8.2 or 8.3 |
| PHP extensions | pdo_mysql, json, mbstring, mail | (usually pre-installed) |
| Database | MySQL 5.7+ or MariaDB 10.3+ | MySQL 8.0+ or MariaDB 10.4+ |
| Web server | Apache 2.4+ with mod_rewrite | — |
| SSL/HTTPS | Required | — |
| Disk space | 50 MB (app files) | 500 MB+ (for uploads) |
1 Create the Database
- Log in to your cPanel control panel
- Go to MySQL Databases
- Create a new database (e.g.,
youruser_hsebox) - Create a new database user with a strong password (mix of letters, numbers, symbols — at least 16 characters)
- Click Add User to Database and grant ALL PRIVILEGES
• Database name • Database username • Database password
2 Upload the Application Files
- You will receive a folder called
HSEBox Web APP.zipcontaining all application files - Open cPanel → File Manager (or connect via FTP/SFTP)
- Navigate to where you want to install HSEBox:
- Main domain: go to
public_html/ - Subfolder: go to
public_html/your-folder-name/ - Subdomain: go to the document root for that subdomain
- Main domain: go to
- Upload all files and folders from the production folder into your chosen directory
After upload, your server directory should contain:
3 Set Folder Permissions
The uploads/ folder needs to be writable so users can upload photos and documents.
- In cPanel → File Manager, right-click the
uploads/folder - Click Change Permissions
- Set to 755 (Owner: Read/Write/Execute, Group: Read/Execute, Public: Read/Execute)
- Make sure this applies to all subfolders inside
uploads/
Alternatively, via SSH:
4 Create the Configuration File
- In your server directory, find the file called
env.example - Copy it and rename the copy to
.env(note the dot at the beginning) - Open
.envfor editing and fill in your values:
Go to any online random string generator, generate a string of at least 64 characters using letters, numbers, and symbols, and paste it as the JWT_SECRET value. This must be unique for each installation.
•
CORS_ORIGIN and APP_URL must be your exact domain including https:// — no trailing slash• If behind Cloudflare or a reverse proxy, set
TRUST_PROXY=15 Import the Database
- Go to cPanel → phpMyAdmin
- Select your database from the left sidebar
- Click the Import tab at the top
- Import three files in this exact order:
File 1: schema.sql — Creates all database tables
File 2: The seed file for your preferred language:
| Language | File |
|---|---|
| English | seed_en.sql |
| Arabic | seed_ar.sql |
| German | seed_de.sql |
| Spanish | seed_es.sql |
| Filipino | seed_fil.sql |
| French | seed_fr.sql |
| Hindi | seed_hi.sql |
| Italian | seed_it.sql |
| Portuguese | seed_pt.sql |
| Turkish | seed_tr.sql |
| Urdu | seed_ur.sql |
File 3: The checklist seed for the same language: seed_checklist_XX.sql
6 Subfolder Configuration (only if applicable)
Skip this step if HSEBox is installed on the root of a domain (e.g., https://hsebox.yourcompany.com).
If you installed it in a subfolder (e.g., https://yourcompany.com/hsebox/):
- Open the
.htaccessfile for editing - Find this line near the top (around line 7):
Remove the # and change it to your folder name:
Save the file.
7 First Access and Setup
- Open your browser and go to your HSEBox URL (e.g.,
https://yourdomain.com) - The Setup Wizard will appear automatically on first access
- Follow the wizard to:
- Enter your company name and details
- Upload your company logo (optional)
- Create the administrator account (email + password)
- Enter your license activation key
- Once complete, you'll be logged in as the administrator
• Create additional users (Settings → User Management)
• Configure project areas
• Start using the HSE modules
8 Verify Everything Works
After setup, perform these quick checks:
| Check | What to do | Expected result |
|---|---|---|
| Health check | Visit /health | { "status": "ok", "db": true, "jwt": true } |
| Security check | Visit /.env | 403 Forbidden error (this is correct) |
| Login | Log in with admin account | Full access to all modules |
🧹 Cleanup (Optional)
After successful installation, you can safely remove these files from the server:
schema.sqlseed_*.sql(all seed files)seed_checklist_*.sql(all checklist seed files)env.example
.htaccess so they can't be accessed via browser, but removing them is good practice.🔧 Troubleshooting
| Problem | Solution |
|---|---|
| Blank white page | Check PHP version is 8.1+ in cPanel → Select PHP Version |
| "Failed to connect" error | Verify .env exists with correct database credentials |
| CORS error in browser | Make sure CORS_ORIGIN in .env matches your exact domain |
| 500 Internal Server Error | Check cPanel → Error Log; verify DB credentials |
| Photos not uploading | Check uploads/ folder permissions are 755 |
| Old content after update | Hard refresh: Ctrl + Shift + R |
Need Help?
Contact HSEBox support with:
Your domain URL · Error message or screenshot · PHP version from cPanel
HSEBox Guia de Instalação no Servidor
📋 Antes de Começar — Requisitos Mínimos
O seu alojamento deve cumprir estes requisitos:
| Requisito | Mínimo | Recomendado |
|---|---|---|
| Tipo de alojamento | cPanel shared hosting ou servidor Apache | cPanel com acesso SSH |
| Versão PHP | 8.1 | 8.2 ou 8.3 |
| Extensões PHP | pdo_mysql, json, mbstring, mail | (geralmente pré-instalado) |
| Base de dados | MySQL 5.7+ ou MariaDB 10.3+ | MySQL 8.0+ ou MariaDB 10.4+ |
| Servidor web | Apache 2.4+ com mod_rewrite | — |
| SSL/HTTPS | Obrigatório | — |
| Espaço em disco | 50 MB (ficheiros da app) | 500 MB+ (para uploads) |
1 Criar a Base de Dados
- Inicie sessão no seu painel de controlo cPanel
- Vá a MySQL Databases
- Crie uma nova base de dados (ex.:
youruser_hsebox) - Crie um novo utilizador da base de dados com uma palavra-passe forte (combinação de letras, números, símbolos — pelo menos 16 caracteres)
- Clique em Add User to Database e conceda ALL PRIVILEGES
• Nome da base de dados • Nome de utilizador • Palavra-passe
2 Carregar os Ficheiros da Aplicação
- Receberá uma pasta chamada
HSEBox Web APP.zipcontendo todos os ficheiros da aplicação - Abra cPanel → Gestor de Ficheiros (ou ligue-se via FTP/SFTP)
- Navegue até onde deseja instalar o HSEBox:
- Domínio principal: vá a
public_html/ - Subpasta: vá a
public_html/your-folder-name/ - Subdomínio: vá à raiz de documentos desse subdomínio
- Domínio principal: vá a
- Carregue todos os ficheiros e pastas da pasta de produção para o diretório escolhido
Após o upload, o diretório do servidor deverá conter:
3 Definir Permissões de Pastas
A pasta uploads/ precisa ser gravável para que os utilizadores possam carregar fotos e documentos.
- Em cPanel → Gestor de Ficheiros, clique com o botão direito na pasta
uploads/ - Clique em Alterar Permissões
- Defina como 755 (Owner: Read/Write/Execute, Group: Read/Execute, Public: Read/Execute)
- Certifique-se de que se aplica a todas as subpastas dentro de
uploads/
Alternativamente, via SSH:
4 Criar o Ficheiro de Configuração
- No diretório do servidor, encontre o ficheiro chamado
env.example - Copie-o e renomeie a cópia para
.env(note o ponto no início) - Abra o
.envpara edição e preencha os seus valores:
Vá a qualquer gerador online de texto aleatório, gere uma string de pelo menos 64 caracteres usando letras, números e símbolos, e cole como valor do JWT_SECRET. Deve ser único para cada instalação.
•
CORS_ORIGIN e APP_URL devem ser o seu domínio exato incluindo https:// — sem barra no final• Se estiver atrás do Cloudflare ou proxy reverso, defina
TRUST_PROXY=15 Importar a Base de Dados
- Vá a cPanel → phpMyAdmin
- Selecione a sua base de dados na barra lateral esquerda
- Clique no separador Import no topo
- Importe três ficheiros nesta ordem exata:
Ficheiro 1: schema.sql — Cria todas as tabelas da base de dados
Ficheiro 2: O ficheiro seed para o seu idioma preferido:
| Language | File |
|---|---|
| English | seed_en.sql |
| Arabic | seed_ar.sql |
| German | seed_de.sql |
| Spanish | seed_es.sql |
| Filipino | seed_fil.sql |
| French | seed_fr.sql |
| Hindi | seed_hi.sql |
| Italian | seed_it.sql |
| Portuguese | seed_pt.sql |
| Turkish | seed_tr.sql |
| Urdu | seed_ur.sql |
Ficheiro 3: O ficheiro seed da checklist para o mesmo idioma: seed_checklist_XX.sql
6 Configuração de Subpasta (apenas se aplicável)
Ignore este passo se o HSEBox estiver instalado na raiz de um domínio (ex.: https://hsebox.yourcompany.com).
Se o instalou numa subpasta (ex.: https://yourcompany.com/hsebox/):
- Abra o ficheiro
.htaccesspara edição - Encontre esta linha perto do topo (cerca da linha 7):
Remova o # e altere para o nome da sua pasta:
Guarde o ficheiro.
7 Primeiro Acesso e Configuração
- Abra o seu navegador e vá ao URL do HSEBox (ex.:
https://yourdomain.com) - O Assistente de Configuração aparecerá automaticamente no primeiro acesso
- Siga o assistente para:
- Introduza o nome e dados da empresa
- Carregue o logótipo da empresa (opcional)
- Crie a conta de administrador (email + palavra-passe)
- Introduza a chave de ativação da licença
- Depois de concluído, estará autenticado como administrador
• Criar utilizadores adicionais (Definições → Gestão de Utilizadores)
• Configurar áreas de projeto
• Começar a utilizar os módulos HSE
8 Verificar que Tudo Funciona
Após a configuração, faça estas verificações rápidas:
| Verificação | O que fazer | Resultado esperado |
|---|---|---|
| Verificação de saúde | Visite /health | { "status": "ok", "db": true, "jwt": true } |
| Verificação de segurança | Visite /.env | Erro 403 Forbidden (isto é correto) |
| Login | Inicie sessão com a conta admin | Acesso total a todos os módulos |
🧹 Limpeza (Opcional)
Após uma instalação bem-sucedida, pode remover com segurança estes ficheiros do servidor:
schema.sqlseed_*.sql(todos os ficheiros seed)seed_checklist_*.sql(todos os ficheiros seed de checklist)env.example
.htaccess e não podem ser acedidos pelo navegador, mas removê-los é uma boa prática.🔧 Resolução de Problemas
| Problema | Solução |
|---|---|
| Página em branco | Verifique se a versão PHP é 8.1+ em cPanel → Select PHP Version |
| Erro "Failed to connect" | Verifique se o .env existe com as credenciais corretas da base de dados |
| Erro CORS no navegador | Certifique-se de que CORS_ORIGIN no .env corresponde ao seu domínio exato |
| Erro 500 Internal Server | Verifique cPanel → Error Log; confirme as credenciais da BD |
| Fotos não carregam | Verifique se as permissões da pasta uploads/ são 755 |
| Conteúdo antigo após atualização | Atualização forçada: Ctrl + Shift + R |
Precisa de Ajuda?
Contacte o suporte HSEBox com:
O seu URL · Mensagem de erro ou captura de ecrã · Versão PHP do cPanel
HSEBox Guía de Instalación en Servidor
📋 Antes de Comenzar — Requisitos Mínimos
Su hosting debe cumplir estos requisitos:
| Requisito | Mínimo | Recomendado |
|---|---|---|
| Tipo de hosting | cPanel shared hosting o servidor Apache | cPanel con acceso SSH |
| Versión PHP | 8.1 | 8.2 o 8.3 |
| Extensiones PHP | pdo_mysql, json, mbstring, mail | (generalmente preinstalado) |
| Base de datos | MySQL 5.7+ o MariaDB 10.3+ | MySQL 8.0+ o MariaDB 10.4+ |
| Servidor web | Apache 2.4+ con mod_rewrite | — |
| SSL/HTTPS | Obligatorio | — |
| Espacio en disco | 50 MB (archivos de la app) | 500 MB+ (para uploads) |
1 Crear la Base de Datos
- Inicie sesión en su panel de control cPanel
- Vaya a MySQL Databases
- Cree una nueva base de datos (ej.:
youruser_hsebox) - Cree un nuevo usuario de base de datos con una contraseña segura (combinación de letras, números, símbolos — al menos 16 caracteres)
- Haga clic en Add User to Database y otorgue ALL PRIVILEGES
• Nombre de la base de datos • Nombre de usuario • Contraseña
2 Subir los Archivos de la Aplicación
- Recibirá una carpeta llamada
HSEBox Web APP.zipque contiene todos los archivos de la aplicación - Abra cPanel → Administrador de Archivos (o conéctese vía FTP/SFTP)
- Navegue hasta donde desea instalar HSEBox:
- Dominio principal: vaya a
public_html/ - Subcarpeta: vaya a
public_html/your-folder-name/ - Subdominio: vaya a la raíz de documentos de ese subdominio
- Dominio principal: vaya a
- Suba todos los archivos y carpetas de la carpeta de producción al directorio elegido
Después de la subida, el directorio del servidor debería contener:
3 Configurar Permisos de Carpetas
La carpeta uploads/ necesita ser escribible para que los usuarios puedan subir fotos y documentos.
- En cPanel → Administrador de Archivos, haga clic derecho en la carpeta
uploads/ - Haga clic en Cambiar Permisos
- Establezca en 755 (Owner: Read/Write/Execute, Group: Read/Execute, Public: Read/Execute)
- Asegúrese de que se aplica a todas las subcarpetas dentro de
uploads/
Alternativamente, vía SSH:
4 Crear el Archivo de Configuración
- En el directorio del servidor, encuentre el archivo llamado
env.example - Cópielo y renombre la copia a
.env(note el punto al inicio) - Abra el
.envpara edición y complete sus valores:
Vaya a cualquier generador de cadenas aleatorias en línea, genere una cadena de al menos 64 caracteres usando letras, números y símbolos, y péguela como valor de JWT_SECRET. Debe ser único para cada instalación.
•
CORS_ORIGIN y APP_URL deben ser su dominio exacto incluyendo https:// — sin barra al final• Si está detrás de Cloudflare o un proxy inverso, establezca
TRUST_PROXY=15 Importar la Base de Datos
- Vaya a cPanel → phpMyAdmin
- Seleccione su base de datos en la barra lateral izquierda
- Haga clic en la pestaña Import en la parte superior
- Importe tres archivos en este orden exacto:
Archivo 1: schema.sql — Crea todas las tablas de la base de datos
Archivo 2: El archivo seed para su idioma preferido:
| Language | File |
|---|---|
| English | seed_en.sql |
| Arabic | seed_ar.sql |
| German | seed_de.sql |
| Spanish | seed_es.sql |
| Filipino | seed_fil.sql |
| French | seed_fr.sql |
| Hindi | seed_hi.sql |
| Italian | seed_it.sql |
| Portuguese | seed_pt.sql |
| Turkish | seed_tr.sql |
| Urdu | seed_ur.sql |
Archivo 3: El archivo seed de checklist para el mismo idioma: seed_checklist_XX.sql
6 Configuración de Subcarpeta (solo si aplica)
Omita este paso si HSEBox está instalado en la raíz de un dominio (ej.: https://hsebox.yourcompany.com).
Si lo instaló en una subcarpeta (ej.: https://yourcompany.com/hsebox/):
- Abra el archivo
.htaccesspara edición - Encuentre esta línea cerca del inicio (alrededor de la línea 7):
Elimine el # y cámbielo al nombre de su carpeta:
Guarde el archivo.
7 Primer Acceso y Configuración
- Abra su navegador y vaya a la URL de HSEBox (ej.:
https://yourdomain.com) - El Asistente de Configuración aparecerá automáticamente en el primer acceso
- Siga el asistente para:
- Ingrese el nombre y datos de la empresa
- Suba el logotipo de la empresa (opcional)
- Cree la cuenta de administrador (email + contraseña)
- Ingrese la clave de activación de la licencia
- Una vez completado, estará conectado como administrador
• Crear usuarios adicionales (Configuración → Gestión de Usuarios)
• Configurar áreas de proyecto
• Comenzar a utilizar los módulos HSE
8 Verificar que Todo Funciona
Después de la configuración, realice estas verificaciones rápidas:
| Verificación | Qué hacer | Resultado esperado |
|---|---|---|
| Verificación de salud | Visite /health | { "status": "ok", "db": true, "jwt": true } |
| Verificación de seguridad | Visite /.env | Error 403 Forbidden (esto es correcto) |
| Login | Inicie sesión con la cuenta admin | Acceso completo a todos los módulos |
🧹 Limpieza (Opcional)
Después de una instalación exitosa, puede eliminar con seguridad estos archivos del servidor:
schema.sqlseed_*.sql(todos los archivos seed)seed_checklist_*.sql(todos los archivos seed de checklist)env.example
.htaccess y no se pueden acceder desde el navegador, pero eliminarlos es una buena práctica.🔧 Solución de Problemas
| Problema | Solución |
|---|---|
| Página en blanco | Verifique que la versión PHP sea 8.1+ en cPanel → Select PHP Version |
| Error "Failed to connect" | Verifique que el .env exista con las credenciales correctas de la base de datos |
| Error CORS en el navegador | Asegúrese de que CORS_ORIGIN en .env coincida con su dominio exacto |
| Error 500 Internal Server | Verifique cPanel → Error Log; confirme las credenciales de la BD |
| Fotos no se suben | Verifique que los permisos de la carpeta uploads/ sean 755 |
| Contenido antiguo después de actualizar | Actualización forzada: Ctrl + Shift + R |
¿Necesita Ayuda?
Contacte al soporte de HSEBox con:
Su URL · Mensaje de error o captura de pantalla · Versión PHP de cPanel
HSEBox دليل تثبيت الخادم
📋 قبل البدء — الحد الأدنى من المتطلبات
يجب أن تستوفي استضافتك هذه المتطلبات:
| المتطلب | الحد الأدنى | الموصى به |
|---|---|---|
| نوع الاستضافة | استضافة مشتركة cPanel أو خادم Apache | cPanel مع وصول SSH |
| إصدار PHP | 8.1 | 8.2 أو 8.3 |
| إضافات PHP | pdo_mysql, json, mbstring, mail | (عادة مثبت مسبقاً) |
| قاعدة البيانات | MySQL 5.7+ أو MariaDB 10.3+ | MySQL 8.0+ أو MariaDB 10.4+ |
| خادم الويب | Apache 2.4+ مع mod_rewrite | — |
| SSL/HTTPS | مطلوب | — |
| مساحة القرص | 50 ميجابايت (ملفات التطبيق) | +500 ميجابايت (للملفات المرفوعة) |
1 إنشاء قاعدة البيانات
- سجّل الدخول إلى لوحة تحكم cPanel
- انتقل إلى MySQL Databases
- أنشئ قاعدة بيانات جديدة (مثال:
youruser_hsebox) - أنشئ مستخدم قاعدة بيانات جديد بـكلمة مرور قوية (مزيج من الأحرف والأرقام والرموز — 16 حرفاً على الأقل)
- انقر على Add User to Database وامنحه ALL PRIVILEGES
• اسم قاعدة البيانات • اسم مستخدم قاعدة البيانات • كلمة مرور قاعدة البيانات
2 رفع ملفات التطبيق
- ستتلقى مجلداً باسم
HSEBox Web APP.zipيحتوي على جميع ملفات التطبيق - افتح cPanel → File Manager (أو اتصل عبر FTP/SFTP)
- انتقل إلى المكان الذي تريد تثبيت HSEBox فيه:
- النطاق الرئيسي: انتقل إلى
public_html/ - مجلد فرعي: انتقل إلى
public_html/your-folder-name/ - نطاق فرعي: انتقل إلى المجلد الجذر لذلك النطاق الفرعي
- النطاق الرئيسي: انتقل إلى
- ارفع جميع الملفات والمجلدات من مجلد الإنتاج إلى المجلد الذي اخترته
بعد الرفع، يجب أن يحتوي مجلد الخادم على:
3 تعيين أذونات المجلدات
يجب أن يكون مجلد uploads/ قابلاً للكتابة حتى يتمكن المستخدمون من رفع الصور والمستندات.
- في cPanel → File Manager، انقر بزر الماوس الأيمن على مجلد
uploads/ - انقر على Change Permissions
- اضبطها على 755 (المالك: قراءة/كتابة/تنفيذ، المجموعة: قراءة/تنفيذ، العام: قراءة/تنفيذ)
- تأكد من تطبيق ذلك على جميع المجلدات الفرعية داخل
uploads/
بدلاً من ذلك، عبر SSH:
4 إنشاء ملف الإعدادات
- في مجلد الخادم، ابحث عن الملف المسمى
env.example - انسخه وأعد تسمية النسخة إلى
.env(لاحظ النقطة في البداية) - افتح
.envللتحرير واملأ القيم الخاصة بك:
انتقل إلى أي مولد نصوص عشوائية عبر الإنترنت، وأنشئ نصاً من 64 حرفاً على الأقل باستخدام الأحرف والأرقام والرموز، ثم الصقه كقيمة JWT_SECRET. يجب أن يكون فريداً لكل تثبيت.
• يجب أن يكون
CORS_ORIGIN و APP_URL هو نطاقك الدقيق بما في ذلك https:// — بدون شرطة مائلة في النهاية• إذا كنت خلف Cloudflare أو وكيل عكسي، اضبط
TRUST_PROXY=15 استيراد قاعدة البيانات
- انتقل إلى cPanel → phpMyAdmin
- اختر قاعدة البيانات من الشريط الجانبي الأيسر
- انقر على علامة التبويب Import في الأعلى
- استورد ثلاثة ملفات بهذا الترتيب بالضبط:
الملف 1: schema.sql — ينشئ جميع جداول قاعدة البيانات
الملف 2: ملف البيانات الأولية للغة المفضلة لديك:
| Language | File |
|---|---|
| English | seed_en.sql |
| Arabic | seed_ar.sql |
| German | seed_de.sql |
| Spanish | seed_es.sql |
| Filipino | seed_fil.sql |
| French | seed_fr.sql |
| Hindi | seed_hi.sql |
| Italian | seed_it.sql |
| Portuguese | seed_pt.sql |
| Turkish | seed_tr.sql |
| Urdu | seed_ur.sql |
الملف 3: ملف بيانات قوائم التحقق لنفس اللغة: seed_checklist_XX.sql
6 إعدادات المجلد الفرعي (فقط إذا كان ذلك ينطبق)
تخطَّ هذه الخطوة إذا تم تثبيت HSEBox على جذر النطاق (مثال: https://hsebox.yourcompany.com).
إذا قمت بتثبيته في مجلد فرعي (مثال: https://yourcompany.com/hsebox/):
- افتح ملف
.htaccessللتحرير - ابحث عن هذا السطر بالقرب من الأعلى (حوالي السطر 7):
أزل # وغيّره إلى اسم مجلدك:
احفظ الملف.
7 الوصول الأول والإعداد
- افتح المتصفح وانتقل إلى عنوان URL الخاص بـ HSEBox (مثال:
https://yourdomain.com) - سيظهر معالج الإعداد تلقائياً عند الوصول الأول
- اتبع المعالج لـ:
- إدخال اسم شركتك وتفاصيلها
- رفع شعار شركتك (اختياري)
- إنشاء حساب المدير (البريد الإلكتروني + كلمة المرور)
- إدخال مفتاح تفعيل الترخيص
- بمجرد الانتهاء، ستسجل الدخول كمدير
• إنشاء مستخدمين إضافيين (الإعدادات → إدارة المستخدمين)
• تكوين مناطق المشروع
• البدء في استخدام وحدات HSE
8 التحقق من أن كل شيء يعمل
بعد الإعداد، قم بهذه الفحوصات السريعة:
| الفحص | ماذا تفعل | النتيجة المتوقعة |
|---|---|---|
| فحص الصحة | قم بزيارة /health | { "status": "ok", "db": true, "jwt": true } |
| فحص الأمان | قم بزيارة /.env | خطأ 403 Forbidden (هذا صحيح) |
| تسجيل الدخول | سجّل الدخول بحساب المدير | وصول كامل لجميع الوحدات |
🧹 التنظيف (اختياري)
بعد التثبيت الناجح، يمكنك حذف هذه الملفات بأمان من الخادم:
schema.sqlseed_*.sql(جميع ملفات البيانات الأولية)seed_checklist_*.sql(جميع ملفات بيانات قوائم التحقق)env.example
.htaccess لذا لا يمكن الوصول إليها عبر المتصفح، لكن حذفها يُعد ممارسة جيدة.🔧 استكشاف الأخطاء وإصلاحها
| المشكلة | الحل |
|---|---|
| صفحة بيضاء فارغة | تحقق من أن إصدار PHP هو 8.1+ في cPanel → Select PHP Version |
| خطأ "Failed to connect" | تحقق من وجود ملف .env مع بيانات اعتماد قاعدة البيانات الصحيحة |
| خطأ CORS في المتصفح | تأكد من أن CORS_ORIGIN في .env يطابق نطاقك بالضبط |
| خطأ 500 Internal Server Error | تحقق من cPanel → Error Log؛ تحقق من بيانات اعتماد قاعدة البيانات |
| الصور لا ترفع | تحقق من أن أذونات مجلد uploads/ هي 755 |
| محتوى قديم بعد التحديث | تحديث إجباري: Ctrl + Shift + R |
هل تحتاج مساعدة؟
تواصل مع دعم HSEBox مع:
عنوان URL الخاص بك · رسالة الخطأ أو لقطة شاشة · إصدار PHP من cPanel
HSEBox Server-Installationsanleitung
📋 Bevor Sie beginnen — Mindestanforderungen
Ihr Hosting muss diese Anforderungen erfüllen:
| Anforderung | Minimum | Empfohlen |
|---|---|---|
| Hosting-Typ | cPanel Shared Hosting oder Apache-Server | cPanel mit SSH-Zugang |
| PHP-Version | 8.1 | 8.2 oder 8.3 |
| PHP-Erweiterungen | pdo_mysql, json, mbstring, mail | (normalerweise vorinstalliert) |
| Datenbank | MySQL 5.7+ oder MariaDB 10.3+ | MySQL 8.0+ oder MariaDB 10.4+ |
| Webserver | Apache 2.4+ mit mod_rewrite | — |
| SSL/HTTPS | Erforderlich | — |
| Speicherplatz | 50 MB (App-Dateien) | 500 MB+ (für Uploads) |
1 Datenbank erstellen
- Melden Sie sich in Ihrem cPanel-Kontrollpanel an
- Gehen Sie zu MySQL Databases
- Erstellen Sie eine neue Datenbank (z.B.
youruser_hsebox) - Erstellen Sie einen neuen Datenbankbenutzer mit einem starken Passwort (Mischung aus Buchstaben, Zahlen, Sonderzeichen — mindestens 16 Zeichen)
- Klicken Sie auf Add User to Database und vergeben Sie ALL PRIVILEGES
• Datenbankname • Datenbankbenutzername • Datenbankpasswort
2 Anwendungsdateien hochladen
- Sie erhalten einen Ordner namens
HSEBox Web APP.zipmit allen Anwendungsdateien - Öffnen Sie cPanel → File Manager (oder verbinden Sie sich per FTP/SFTP)
- Navigieren Sie zu dem Ort, an dem Sie HSEBox installieren möchten:
- Hauptdomain: gehen Sie zu
public_html/ - Unterordner: gehen Sie zu
public_html/your-folder-name/ - Subdomain: gehen Sie zum Dokumentenstamm dieser Subdomain
- Hauptdomain: gehen Sie zu
- Laden Sie alle Dateien und Ordner aus dem Produktionsordner in Ihr gewähltes Verzeichnis hoch
Nach dem Hochladen sollte Ihr Serververzeichnis Folgendes enthalten:
3 Ordnerberechtigungen festlegen
Der Ordner uploads/ muss beschreibbar sein, damit Benutzer Fotos und Dokumente hochladen können.
- Klicken Sie in cPanel → File Manager mit der rechten Maustaste auf den Ordner
uploads/ - Klicken Sie auf Change Permissions
- Setzen Sie auf 755 (Besitzer: Lesen/Schreiben/Ausführen, Gruppe: Lesen/Ausführen, Öffentlich: Lesen/Ausführen)
- Stellen Sie sicher, dass dies für alle Unterordner innerhalb von
uploads/gilt
Alternativ über SSH:
4 Konfigurationsdatei erstellen
- Suchen Sie in Ihrem Serververzeichnis die Datei namens
env.example - Kopieren Sie sie und benennen Sie die Kopie in
.envum (beachten Sie den Punkt am Anfang) - Öffnen Sie
.envzum Bearbeiten und tragen Sie Ihre Werte ein:
Gehen Sie zu einem beliebigen Online-Zufallsstring-Generator, erstellen Sie einen String mit mindestens 64 Zeichen aus Buchstaben, Zahlen und Sonderzeichen und fügen Sie ihn als JWT_SECRET-Wert ein. Dieser muss für jede Installation einzigartig sein.
•
CORS_ORIGIN und APP_URL müssen Ihre exakte Domain einschließlich https:// sein — ohne abschließenden Schrägstrich• Wenn Sie hinter Cloudflare oder einem Reverse-Proxy sind, setzen Sie
TRUST_PROXY=15 Datenbank importieren
- Gehen Sie zu cPanel → phpMyAdmin
- Wählen Sie Ihre Datenbank in der linken Seitenleiste aus
- Klicken Sie oben auf den Reiter Import
- Importieren Sie drei Dateien in genau dieser Reihenfolge:
Datei 1: schema.sql — Erstellt alle Datenbanktabellen
Datei 2: Die Seed-Datei für Ihre bevorzugte Sprache:
| Language | File |
|---|---|
| English | seed_en.sql |
| Arabic | seed_ar.sql |
| German | seed_de.sql |
| Spanish | seed_es.sql |
| Filipino | seed_fil.sql |
| French | seed_fr.sql |
| Hindi | seed_hi.sql |
| Italian | seed_it.sql |
| Portuguese | seed_pt.sql |
| Turkish | seed_tr.sql |
| Urdu | seed_ur.sql |
Datei 3: Die Checklisten-Seed-Datei für dieselbe Sprache: seed_checklist_XX.sql
6 Unterordner-Konfiguration (nur falls zutreffend)
Überspringen Sie diesen Schritt, wenn HSEBox im Stammverzeichnis einer Domain installiert ist (z.B. https://hsebox.yourcompany.com).
Wenn Sie es in einem Unterordner installiert haben (z.B. https://yourcompany.com/hsebox/):
- Öffnen Sie die Datei
.htaccesszum Bearbeiten - Suchen Sie diese Zeile in der Nähe des Anfangs (etwa Zeile 7):
Entfernen Sie das # und ändern Sie es in Ihren Ordnernamen:
Speichern Sie die Datei.
7 Erster Zugriff und Einrichtung
- Öffnen Sie Ihren Browser und navigieren Sie zu Ihrer HSEBox-URL (z.B.
https://yourdomain.com) - Der Einrichtungsassistent erscheint automatisch beim ersten Zugriff
- Folgen Sie dem Assistenten, um:
- Ihren Firmennamen und Details einzugeben
- Ihr Firmenlogo hochzuladen (optional)
- Das Administratorkonto zu erstellen (E-Mail + Passwort)
- Ihren Lizenzaktivierungsschlüssel einzugeben
- Nach Abschluss sind Sie als Administrator angemeldet
• Zusätzliche Benutzer erstellen (Einstellungen → Benutzerverwaltung)
• Projektbereiche konfigurieren
• Die HSE-Module nutzen
8 Überprüfen, ob alles funktioniert
Führen Sie nach der Einrichtung diese schnellen Prüfungen durch:
| Prüfung | Was zu tun ist | Erwartetes Ergebnis |
|---|---|---|
| Gesundheitscheck | Besuchen Sie /health | { "status": "ok", "db": true, "jwt": true } |
| Sicherheitscheck | Besuchen Sie /.env | 403 Forbidden-Fehler (das ist korrekt) |
| Anmeldung | Melden Sie sich mit dem Admin-Konto an | Vollzugriff auf alle Module |
🧹 Aufräumen (Optional)
Nach erfolgreicher Installation können Sie diese Dateien sicher vom Server entfernen:
schema.sqlseed_*.sql(alle Seed-Dateien)seed_checklist_*.sql(alle Checklisten-Seed-Dateien)env.example
.htaccess geschützt und können nicht über den Browser aufgerufen werden, aber das Entfernen ist eine gute Praxis.🔧 Fehlerbehebung
| Problem | Lösung |
|---|---|
| Leere weiße Seite | Überprüfen Sie, ob die PHP-Version 8.1+ ist unter cPanel → Select PHP Version |
| Fehler "Failed to connect" | Überprüfen Sie, ob .env mit korrekten Datenbankzugangsdaten existiert |
| CORS-Fehler im Browser | Stellen Sie sicher, dass CORS_ORIGIN in .env mit Ihrer exakten Domain übereinstimmt |
| 500 Internal Server Error | Überprüfen Sie cPanel → Error Log; überprüfen Sie die Datenbankzugangsdaten |
| Fotos werden nicht hochgeladen | Überprüfen Sie, ob die Berechtigungen des Ordners uploads/ auf 755 gesetzt sind |
| Alter Inhalt nach Update | Harter Refresh: Ctrl + Shift + R |
Brauchen Sie Hilfe?
Kontaktieren Sie den HSEBox-Support mit:
Ihre Domain-URL · Fehlermeldung oder Screenshot · PHP-Version aus cPanel
HSEBox Guide d'Installation Serveur
📋 Avant de Commencer — Configuration Minimale Requise
Votre hébergement doit répondre à ces exigences :
| Exigence | Minimum | Recommandé |
|---|---|---|
| Type d'hébergement | Hébergement mutualisé cPanel ou serveur Apache | cPanel avec accès SSH |
| Version PHP | 8.1 | 8.2 ou 8.3 |
| Extensions PHP | pdo_mysql, json, mbstring, mail | (généralement préinstallé) |
| Base de données | MySQL 5.7+ ou MariaDB 10.3+ | MySQL 8.0+ ou MariaDB 10.4+ |
| Serveur web | Apache 2.4+ avec mod_rewrite | — |
| SSL/HTTPS | Obligatoire | — |
| Espace disque | 50 Mo (fichiers de l'app) | 500 Mo+ (pour les uploads) |
1 Créer la Base de Données
- Connectez-vous à votre panneau de contrôle cPanel
- Allez dans MySQL Databases
- Créez une nouvelle base de données (ex. :
youruser_hsebox) - Créez un nouvel utilisateur de base de données avec un mot de passe fort (mélange de lettres, chiffres, symboles — au moins 16 caractères)
- Cliquez sur Add User to Database et accordez ALL PRIVILEGES
• Nom de la base de données • Nom d'utilisateur de la base de données • Mot de passe de la base de données
2 Téléverser les Fichiers de l'Application
- Vous recevrez un dossier appelé
HSEBox Web APP.zipcontenant tous les fichiers de l'application - Ouvrez cPanel → File Manager (ou connectez-vous via FTP/SFTP)
- Naviguez jusqu'à l'emplacement où vous souhaitez installer HSEBox :
- Domaine principal : allez dans
public_html/ - Sous-dossier : allez dans
public_html/nom-du-dossier/ - Sous-domaine : allez dans le répertoire racine de ce sous-domaine
- Domaine principal : allez dans
- Téléversez tous les fichiers et dossiers du dossier de production dans le répertoire choisi
Après le téléversement, le répertoire de votre serveur devrait contenir :
3 Définir les Permissions des Dossiers
Le dossier uploads/ doit être accessible en écriture pour que les utilisateurs puissent téléverser des photos et documents.
- Dans cPanel → File Manager, faites un clic droit sur le dossier
uploads/ - Cliquez sur Change Permissions
- Définissez sur 755 (Propriétaire : Lecture/Écriture/Exécution, Groupe : Lecture/Exécution, Public : Lecture/Exécution)
- Assurez-vous que cela s'applique à tous les sous-dossiers dans
uploads/
Alternativement, via SSH :
4 Créer le Fichier de Configuration
- Dans le répertoire de votre serveur, trouvez le fichier appelé
env.example - Copiez-le et renommez la copie en
.env(notez le point au début) - Ouvrez
.envpour l'éditer et renseignez vos valeurs :
Allez sur n'importe quel générateur de chaînes aléatoires en ligne, générez une chaîne d'au moins 64 caractères utilisant des lettres, chiffres et symboles, et collez-la comme valeur de JWT_SECRET. Elle doit être unique pour chaque installation.
•
CORS_ORIGIN et APP_URL doivent correspondre à votre domaine exact incluant https:// — sans barre oblique finale• Si vous êtes derrière Cloudflare ou un proxy inverse, définissez
TRUST_PROXY=15 Importer la Base de Données
- Allez dans cPanel → phpMyAdmin
- Sélectionnez votre base de données dans la barre latérale gauche
- Cliquez sur l'onglet Import en haut
- Importez trois fichiers dans cet ordre exact :
Fichier 1 : schema.sql — Crée toutes les tables de la base de données
Fichier 2 : Le fichier seed pour la langue de votre choix :
| Language | File |
|---|---|
| English | seed_en.sql |
| Arabic | seed_ar.sql |
| German | seed_de.sql |
| Spanish | seed_es.sql |
| Filipino | seed_fil.sql |
| French | seed_fr.sql |
| Hindi | seed_hi.sql |
| Italian | seed_it.sql |
| Portuguese | seed_pt.sql |
| Turkish | seed_tr.sql |
| Urdu | seed_ur.sql |
Fichier 3 : Le seed de checklist pour la même langue : seed_checklist_XX.sql
6 Configuration du Sous-dossier (uniquement si applicable)
Ignorez cette étape si HSEBox est installé à la racine d'un domaine (ex. : https://hsebox.yourcompany.com).
Si vous l'avez installé dans un sous-dossier (ex. : https://yourcompany.com/hsebox/) :
- Ouvrez le fichier
.htaccesspour l'éditer - Trouvez cette ligne près du début (vers la ligne 7) :
Supprimez le # et modifiez-le avec le nom de votre dossier :
Enregistrez le fichier.
7 Premier Accès et Configuration
- Ouvrez votre navigateur et accédez à votre URL HSEBox (ex. :
https://yourdomain.com) - L'Assistant de Configuration apparaîtra automatiquement lors du premier accès
- Suivez l'assistant pour :
- Saisir le nom et les détails de votre entreprise
- Téléverser le logo de votre entreprise (optionnel)
- Créer le compte administrateur (e-mail + mot de passe)
- Saisir votre clé d'activation de licence
- Une fois terminé, vous serez connecté en tant qu'administrateur
• Créer des utilisateurs supplémentaires (Paramètres → Gestion des utilisateurs)
• Configurer les zones de projet
• Commencer à utiliser les modules HSE
8 Vérifier que Tout Fonctionne
Après la configuration, effectuez ces vérifications rapides :
| Vérification | Que faire | Résultat attendu |
|---|---|---|
| Vérification de santé | Visitez /health | { "status": "ok", "db": true, "jwt": true } |
| Vérification de sécurité | Visitez /.env | Erreur 403 Forbidden (c'est normal) |
| Connexion | Connectez-vous avec le compte admin | Accès complet à tous les modules |
🧹 Nettoyage (Optionnel)
Après une installation réussie, vous pouvez supprimer en toute sécurité ces fichiers du serveur :
schema.sqlseed_*.sql(tous les fichiers seed)seed_checklist_*.sql(tous les fichiers seed de checklist)env.example
.htaccess et ne sont donc pas accessibles via le navigateur, mais les supprimer est une bonne pratique.🔧 Dépannage
| Problème | Solution |
|---|---|
| Page blanche | Vérifiez que la version PHP est 8.1+ dans cPanel → Select PHP Version |
| Erreur « Failed to connect » | Vérifiez que .env existe avec les identifiants de base de données corrects |
| Erreur CORS dans le navigateur | Assurez-vous que CORS_ORIGIN dans .env correspond à votre domaine exact |
| 500 Internal Server Error | Vérifiez cPanel → Error Log ; vérifiez les identifiants de la base de données |
| Les photos ne se téléversent pas | Vérifiez que les permissions du dossier uploads/ sont à 755 |
| Contenu obsolète après mise à jour | Actualisation forcée : Ctrl + Shift + R |
Besoin d'Aide ?
Contactez le support HSEBox avec :
Votre URL de domaine · Message d'erreur ou capture d'écran · Version PHP depuis cPanel
HSEBox सर्वर इंस्टॉलेशन गाइड
📋 शुरू करने से पहले — न्यूनतम आवश्यकताएं
आपकी होस्टिंग को इन आवश्यकताओं को पूरा करना होगा:
| आवश्यकता | न्यूनतम | अनुशंसित |
|---|---|---|
| होस्टिंग प्रकार | cPanel शेयर्ड होस्टिंग या Apache सर्वर | SSH एक्सेस के साथ cPanel |
| PHP संस्करण | 8.1 | 8.2 या 8.3 |
| PHP एक्सटेंशन | pdo_mysql, json, mbstring, mail | (आमतौर पर पहले से इंस्टॉल) |
| डेटाबेस | MySQL 5.7+ या MariaDB 10.3+ | MySQL 8.0+ या MariaDB 10.4+ |
| वेब सर्वर | mod_rewrite के साथ Apache 2.4+ | — |
| SSL/HTTPS | आवश्यक | — |
| डिस्क स्पेस | 50 MB (ऐप फाइलें) | 500 MB+ (अपलोड के लिए) |
1 डेटाबेस बनाएं
- अपने cPanel कंट्रोल पैनल में लॉग इन करें
- MySQL Databases पर जाएं
- एक नया डेटाबेस बनाएं (उदा.:
youruser_hsebox) - एक मजबूत पासवर्ड के साथ एक नया डेटाबेस यूज़र बनाएं (अक्षरों, संख्याओं, प्रतीकों का मिश्रण — कम से कम 16 अक्षर)
- Add User to Database पर क्लिक करें और ALL PRIVILEGES प्रदान करें
• डेटाबेस का नाम • डेटाबेस यूज़रनेम • डेटाबेस पासवर्ड
2 एप्लिकेशन फाइलें अपलोड करें
- आपको
HSEBox Web APP.zipनामक एक फोल्डर मिलेगा जिसमें सभी एप्लिकेशन फाइलें हैं - cPanel → File Manager खोलें (या FTP/SFTP से कनेक्ट करें)
- उस स्थान पर नेविगेट करें जहां आप HSEBox इंस्टॉल करना चाहते हैं:
- मुख्य डोमेन:
public_html/पर जाएं - सबफोल्डर:
public_html/your-folder-name/पर जाएं - सबडोमेन: उस सबडोमेन के डॉक्यूमेंट रूट पर जाएं
- मुख्य डोमेन:
- प्रोडक्शन फोल्डर से सभी फाइलें और फोल्डर अपनी चुनी हुई डायरेक्टरी में अपलोड करें
अपलोड के बाद, आपकी सर्वर डायरेक्टरी में यह होना चाहिए:
3 फोल्डर अनुमतियां सेट करें
uploads/ फोल्डर को लिखने योग्य होना चाहिए ताकि उपयोगकर्ता फोटो और दस्तावेज़ अपलोड कर सकें।
- cPanel → File Manager में,
uploads/फोल्डर पर राइट-क्लिक करें - Change Permissions पर क्लिक करें
- 755 पर सेट करें (Owner: Read/Write/Execute, Group: Read/Execute, Public: Read/Execute)
- सुनिश्चित करें कि यह
uploads/के अंदर सभी सबफोल्डर पर लागू हो
वैकल्पिक रूप से, SSH के माध्यम से:
4 कॉन्फ़िगरेशन फाइल बनाएं
- अपनी सर्वर डायरेक्टरी में,
env.exampleनामक फाइल खोजें - इसे कॉपी करें और कॉपी का नाम
.envरखें (शुरुआत में डॉट पर ध्यान दें) .envको एडिट करने के लिए खोलें और अपनी वैल्यू भरें:
किसी भी ऑनलाइन रैंडम स्ट्रिंग जनरेटर पर जाएं, अक्षरों, संख्याओं और प्रतीकों का उपयोग करके कम से कम 64 अक्षरों की एक स्ट्रिंग जनरेट करें, और इसे JWT_SECRET वैल्यू के रूप में पेस्ट करें। यह प्रत्येक इंस्टॉलेशन के लिए अद्वितीय होनी चाहिए।
•
CORS_ORIGIN और APP_URL आपका सटीक डोमेन होना चाहिए जिसमें https:// शामिल हो — अंत में स्लैश नहीं• यदि Cloudflare या रिवर्स प्रॉक्सी के पीछे हैं, तो
TRUST_PROXY=1 सेट करें5 डेटाबेस इम्पोर्ट करें
- cPanel → phpMyAdmin पर जाएं
- बाईं साइडबार से अपना डेटाबेस चुनें
- शीर्ष पर Import टैब पर क्लिक करें
- तीन फाइलें इसी क्रम में इम्पोर्ट करें:
फाइल 1: schema.sql — सभी डेटाबेस टेबल बनाती है
फाइल 2: आपकी पसंदीदा भाषा के लिए seed फाइल:
| Language | File |
|---|---|
| English | seed_en.sql |
| Arabic | seed_ar.sql |
| German | seed_de.sql |
| Spanish | seed_es.sql |
| Filipino | seed_fil.sql |
| French | seed_fr.sql |
| Hindi | seed_hi.sql |
| Italian | seed_it.sql |
| Portuguese | seed_pt.sql |
| Turkish | seed_tr.sql |
| Urdu | seed_ur.sql |
फाइल 3: उसी भाषा के लिए checklist seed: seed_checklist_XX.sql
6 सबफोल्डर कॉन्फ़िगरेशन (केवल यदि लागू हो)
इस स्टेप को छोड़ दें यदि HSEBox किसी डोमेन के रूट पर इंस्टॉल है (उदा.: https://hsebox.yourcompany.com)।
यदि आपने इसे सबफोल्डर में इंस्टॉल किया है (उदा.: https://yourcompany.com/hsebox/):
.htaccessफाइल को एडिट करने के लिए खोलें- शीर्ष के पास यह लाइन खोजें (लगभग लाइन 7 पर):
# हटाएं और इसे अपने फोल्डर के नाम से बदलें:
फाइल सेव करें।
7 पहला एक्सेस और सेटअप
- अपना ब्राउज़र खोलें और अपने HSEBox URL पर जाएं (उदा.:
https://yourdomain.com) - पहली बार एक्सेस करने पर सेटअप विज़ार्ड स्वचालित रूप से दिखाई देगा
- विज़ार्ड का अनुसरण करें:
- अपनी कंपनी का नाम और विवरण दर्ज करें
- अपनी कंपनी का लोगो अपलोड करें (वैकल्पिक)
- एडमिनिस्ट्रेटर अकाउंट बनाएं (ईमेल + पासवर्ड)
- अपनी लाइसेंस एक्टिवेशन कुंजी दर्ज करें
- पूरा होने पर, आप एडमिनिस्ट्रेटर के रूप में लॉग इन हो जाएंगे
• अतिरिक्त उपयोगकर्ता बनाएं (Settings → User Management)
• प्रोजेक्ट क्षेत्र कॉन्फ़िगर करें
• HSE मॉड्यूल का उपयोग शुरू करें
8 सत्यापित करें कि सब कुछ काम करता है
सेटअप के बाद, ये त्वरित जांच करें:
| जांच | क्या करें | अपेक्षित परिणाम |
|---|---|---|
| हेल्थ चेक | /health पर जाएं | { "status": "ok", "db": true, "jwt": true } |
| सुरक्षा जांच | /.env पर जाएं | 403 Forbidden त्रुटि (यह सही है) |
| लॉगिन | एडमिन अकाउंट से लॉग इन करें | सभी मॉड्यूल तक पूर्ण पहुंच |
🧹 सफाई (वैकल्पिक)
सफल इंस्टॉलेशन के बाद, आप सर्वर से इन फाइलों को सुरक्षित रूप से हटा सकते हैं:
schema.sqlseed_*.sql(सभी seed फाइलें)seed_checklist_*.sql(सभी checklist seed फाइलें)env.example
.htaccess द्वारा सुरक्षित हैं इसलिए ब्राउज़र के माध्यम से एक्सेस नहीं की जा सकतीं, लेकिन इन्हें हटाना अच्छी प्रथा है।🔧 समस्या निवारण
| समस्या | समाधान |
|---|---|
| खाली सफेद पेज | cPanel → Select PHP Version में जांचें कि PHP संस्करण 8.1+ है |
| « Failed to connect » त्रुटि | सत्यापित करें कि .env सही डेटाबेस क्रेडेंशियल्स के साथ मौजूद है |
| ब्राउज़र में CORS त्रुटि | सुनिश्चित करें कि .env में CORS_ORIGIN आपके सटीक डोमेन से मेल खाता है |
| 500 Internal Server Error | cPanel → Error Log जांचें; DB क्रेडेंशियल्स सत्यापित करें |
| फोटो अपलोड नहीं हो रहीं | जांचें कि uploads/ फोल्डर की अनुमतियां 755 हैं |
| अपडेट के बाद पुरानी सामग्री | हार्ड रिफ्रेश करें: Ctrl + Shift + R |
मदद चाहिए?
HSEBox सपोर्ट से संपर्क करें:
आपका डोमेन URL · त्रुटि संदेश या स्क्रीनशॉट · cPanel से PHP संस्करण
HSEBox Guida all'Installazione Server
📋 Prima di Iniziare — Requisiti Minimi
Il vostro hosting deve soddisfare questi requisiti:
| Requisito | Minimo | Raccomandato |
|---|---|---|
| Tipo di hosting | cPanel hosting condiviso o server Apache | cPanel con accesso SSH |
| Versione PHP | 8.1 | 8.2 o 8.3 |
| Estensioni PHP | pdo_mysql, json, mbstring, mail | (solitamente preinstallato) |
| Database | MySQL 5.7+ o MariaDB 10.3+ | MySQL 8.0+ o MariaDB 10.4+ |
| Server web | Apache 2.4+ con mod_rewrite | — |
| SSL/HTTPS | Obbligatorio | — |
| Spazio su disco | 50 MB (file dell'app) | 500 MB+ (per upload) |
1 Creare il Database
- Accedete al vostro pannello di controllo cPanel
- Andate su MySQL Databases
- Create un nuovo database (es.
youruser_hsebox) - Create un nuovo utente database con una password complessa (combinazione di lettere, numeri, simboli — almeno 16 caratteri)
- Cliccate su Add User to Database e concedete ALL PRIVILEGES
• Nome del database • Nome utente del database • Password del database
2 Caricare i File dell'Applicazione
- Riceverete una cartella chiamata
HSEBox Web APP.zipcontenente tutti i file dell'applicazione - Aprite cPanel → File Manager (o connettetevi tramite FTP/SFTP)
- Navigate nella posizione in cui desiderate installare HSEBox:
- Dominio principale: andate su
public_html/ - Sottocartella: andate su
public_html/nome-della-cartella/ - Sottodominio: andate nella document root di quel sottodominio
- Dominio principale: andate su
- Caricate tutti i file e le cartelle dalla cartella di produzione nella directory scelta
Dopo il caricamento, la directory del server dovrebbe contenere:
3 Impostare i Permessi delle Cartelle
La cartella uploads/ deve essere scrivibile affinché gli utenti possano caricare foto e documenti.
- In cPanel → File Manager, cliccate con il tasto destro sulla cartella
uploads/ - Cliccate su Change Permissions
- Impostate a 755 (Proprietario: Lettura/Scrittura/Esecuzione, Gruppo: Lettura/Esecuzione, Pubblico: Lettura/Esecuzione)
- Assicuratevi che questo si applichi a tutte le sottocartelle all'interno di
uploads/
In alternativa, tramite SSH:
4 Creare il File di Configurazione
- Nella directory del server, trovate il file chiamato
env.example - Copiatelo e rinominate la copia in
.env(notate il punto all'inizio) - Aprite
.envper la modifica e inserite i vostri valori:
Andate su un qualsiasi generatore di stringhe casuali online, generate una stringa di almeno 64 caratteri utilizzando lettere, numeri e simboli, e incollatela come valore di JWT_SECRET. Questo valore deve essere unico per ogni installazione.
•
CORS_ORIGIN e APP_URL devono corrispondere esattamente al vostro dominio includendo https:// — senza barra finale• Se siete dietro Cloudflare o un reverse proxy, impostate
TRUST_PROXY=15 Importare il Database
- Andate su cPanel → phpMyAdmin
- Selezionate il vostro database dalla barra laterale sinistra
- Cliccate sulla scheda Import in alto
- Importate tre file esattamente in questo ordine:
File 1: schema.sql — Crea tutte le tabelle del database
File 2: Il file seed per la lingua preferita:
| Language | File |
|---|---|
| English | seed_en.sql |
| Arabic | seed_ar.sql |
| German | seed_de.sql |
| Spanish | seed_es.sql |
| Filipino | seed_fil.sql |
| French | seed_fr.sql |
| Hindi | seed_hi.sql |
| Italian | seed_it.sql |
| Portuguese | seed_pt.sql |
| Turkish | seed_tr.sql |
| Urdu | seed_ur.sql |
File 3: Il file seed checklist per la stessa lingua: seed_checklist_XX.sql
6 Configurazione Sottocartella (solo se applicabile)
Saltate questo passaggio se HSEBox è installato nella root di un dominio (es. https://hsebox.yourcompany.com).
Se lo avete installato in una sottocartella (es. https://yourcompany.com/hsebox/):
- Aprite il file
.htaccessper la modifica - Trovate questa riga vicino all'inizio (circa alla riga 7):
Rimuovete il # e sostituitelo con il nome della vostra cartella:
Salvate il file.
7 Primo Accesso e Configurazione
- Aprite il browser e andate al vostro URL HSEBox (es.
https://yourdomain.com) - La Procedura Guidata di Configurazione apparirà automaticamente al primo accesso
- Seguite la procedura guidata per:
- Inserire il nome e i dettagli della vostra azienda
- Caricare il logo aziendale (opzionale)
- Creare l'account amministratore (email + password)
- Inserire la chiave di attivazione della licenza
- Una volta completato, sarete connessi come amministratore
• Creare utenti aggiuntivi (Impostazioni → Gestione Utenti)
• Configurare le aree di progetto
• Iniziare a utilizzare i moduli HSE
8 Verificare che Tutto Funzioni
Dopo la configurazione, eseguite questi controlli rapidi:
| Controllo | Cosa fare | Risultato atteso |
|---|---|---|
| Controllo stato | Visitate /health | { "status": "ok", "db": true, "jwt": true } |
| Controllo sicurezza | Visitate /.env | Errore 403 Forbidden (questo è corretto) |
| Accesso | Accedete con l'account admin | Accesso completo a tutti i moduli |
🧹 Pulizia (Opzionale)
Dopo un'installazione riuscita, potete rimuovere in sicurezza questi file dal server:
schema.sqlseed_*.sql(tutti i file seed)seed_checklist_*.sql(tutti i file seed checklist)env.example
.htaccess quindi non possono essere accessibili tramite browser, ma rimuoverli è una buona pratica.🔧 Risoluzione dei Problemi
| Problema | Soluzione |
|---|---|
| Pagina bianca vuota | Verificate che la versione PHP sia 8.1+ in cPanel → Select PHP Version |
| Errore "Failed to connect" | Verificate che .env esista con le credenziali database corrette |
| Errore CORS nel browser | Assicuratevi che CORS_ORIGIN in .env corrisponda esattamente al vostro dominio |
| 500 Internal Server Error | Controllate cPanel → Error Log; verificate le credenziali del DB |
| Le foto non si caricano | Controllate che i permessi della cartella uploads/ siano 755 |
| Contenuto vecchio dopo aggiornamento | Aggiornamento forzato: Ctrl + Shift + R |
Hai Bisogno di Aiuto?
Contatta il supporto HSEBox con:
URL del vostro dominio · Messaggio di errore o screenshot · Versione PHP dal cPanel
HSEBox Gabay sa Pag-install sa Server
📋 Bago Magsimula — Minimum na Kinakailangan
Kailangang matugunan ng iyong hosting ang mga sumusunod na kinakailangan:
| Kinakailangan | Minimum | Inirerekomenda |
|---|---|---|
| Uri ng hosting | cPanel shared hosting o Apache server | cPanel na may SSH access |
| Bersyon ng PHP | 8.1 | 8.2 o 8.3 |
| PHP extensions | pdo_mysql, json, mbstring, mail | (karaniwang naka-install na) |
| Database | MySQL 5.7+ o MariaDB 10.3+ | MySQL 8.0+ o MariaDB 10.4+ |
| Web server | Apache 2.4+ na may mod_rewrite | — |
| SSL/HTTPS | Kinakailangan | — |
| Disk space | 50 MB (app files) | 500 MB+ (para sa uploads) |
1 Gumawa ng Database
- Mag-log in sa iyong cPanel control panel
- Pumunta sa MySQL Databases
- Gumawa ng bagong database (hal.,
youruser_hsebox) - Gumawa ng bagong database user na may matibay na password (halo ng mga letra, numero, simbolo — hindi bababa sa 16 na karakter)
- I-click ang Add User to Database at ibigay ang ALL PRIVILEGES
• Pangalan ng database • Username ng database • Password ng database
2 I-upload ang mga Application Files
- Makakatanggap ka ng folder na tinatawag na
HSEBox Web APP.zipna naglalaman ng lahat ng application files - Buksan ang cPanel → File Manager (o kumonekta sa pamamagitan ng FTP/SFTP)
- Mag-navigate sa kung saan mo gustong i-install ang HSEBox:
- Main domain: pumunta sa
public_html/ - Subfolder: pumunta sa
public_html/your-folder-name/ - Subdomain: pumunta sa document root ng subdomain na iyon
- Main domain: pumunta sa
- I-upload ang lahat ng files at folders mula sa production folder papunta sa iyong napiling directory
Pagkatapos mag-upload, ang iyong server directory ay dapat naglalaman ng:
3 I-set ang Folder Permissions
Ang uploads/ folder ay kailangang writable para makapag-upload ang mga user ng mga larawan at dokumento.
- Sa cPanel → File Manager, i-right-click ang
uploads/folder - I-click ang Change Permissions
- I-set sa 755 (Owner: Read/Write/Execute, Group: Read/Execute, Public: Read/Execute)
- Siguraduhing naka-apply ito sa lahat ng subfolders sa loob ng
uploads/
Bilang alternatibo, sa pamamagitan ng SSH:
4 Gumawa ng Configuration File
- Sa iyong server directory, hanapin ang file na tinatawag na
env.example - Kopyahin ito at palitan ang pangalan ng kopya sa
.env(pansinin ang tuldok sa simula) - Buksan ang
.envpara i-edit at ilagay ang iyong mga value:
Pumunta sa kahit anong online random string generator, gumawa ng string na hindi bababa sa 64 na karakter gamit ang mga letra, numero, at simbolo, at i-paste ito bilang JWT_SECRET value. Kailangang natatangi ito para sa bawat installation.
• Ang
CORS_ORIGIN at APP_URL ay dapat eksaktong tumugma sa iyong domain kasama ang https:// — walang trailing slash• Kung nasa likod ng Cloudflare o reverse proxy, i-set ang
TRUST_PROXY=15 I-import ang Database
- Pumunta sa cPanel → phpMyAdmin
- Piliin ang iyong database mula sa kaliwang sidebar
- I-click ang Import tab sa itaas
- Mag-import ng tatlong files sa eksaktong pagkakasunod-sunod na ito:
File 1: schema.sql — Gumagawa ng lahat ng database tables
File 2: Ang seed file para sa iyong gustong wika:
| Language | File |
|---|---|
| English | seed_en.sql |
| Arabic | seed_ar.sql |
| German | seed_de.sql |
| Spanish | seed_es.sql |
| Filipino | seed_fil.sql |
| French | seed_fr.sql |
| Hindi | seed_hi.sql |
| Italian | seed_it.sql |
| Portuguese | seed_pt.sql |
| Turkish | seed_tr.sql |
| Urdu | seed_ur.sql |
File 3: Ang checklist seed para sa parehong wika: seed_checklist_XX.sql
6 Subfolder Configuration (kung kinakailangan lamang)
Laktawan ang hakbang na ito kung ang HSEBox ay naka-install sa root ng isang domain (hal., https://hsebox.yourcompany.com).
Kung in-install mo ito sa isang subfolder (hal., https://yourcompany.com/hsebox/):
- Buksan ang
.htaccessfile para i-edit - Hanapin ang linyang ito malapit sa itaas (mga linya 7):
Alisin ang # at palitan ito ng pangalan ng iyong folder:
I-save ang file.
7 Unang Access at Setup
- Buksan ang iyong browser at pumunta sa iyong HSEBox URL (hal.,
https://yourdomain.com) - Awtomatikong lalabas ang Setup Wizard sa unang access
- Sundin ang wizard para:
- Ilagay ang pangalan at detalye ng iyong kumpanya
- I-upload ang logo ng kumpanya (opsyonal)
- Gumawa ng administrator account (email + password)
- Ilagay ang iyong license activation key
- Kapag tapos na, naka-log in ka na bilang administrator
• Gumawa ng karagdagang mga user (Settings → User Management)
• I-configure ang mga project area
• Simulan ang paggamit ng mga HSE module
8 I-verify na Gumagana ang Lahat
Pagkatapos ng setup, gawin ang mga mabilisang pagsusuri na ito:
| Pagsusuri | Gagawin | Inaasahang resulta |
|---|---|---|
| Health check | Bisitahin ang /health | { "status": "ok", "db": true, "jwt": true } |
| Security check | Bisitahin ang /.env | 403 Forbidden error (tama ito) |
| Login | Mag-log in gamit ang admin account | Buong access sa lahat ng modules |
🧹 Paglilinis (Opsyonal)
Pagkatapos ng matagumpay na pag-install, maaari mong ligtas na alisin ang mga file na ito mula sa server:
schema.sqlseed_*.sql(lahat ng seed files)seed_checklist_*.sql(lahat ng checklist seed files)env.example
.htaccess kaya hindi ma-access sa pamamagitan ng browser, ngunit magandang practice ang pag-alis ng mga ito.🔧 Pag-troubleshoot
| Problema | Solusyon |
|---|---|
| Blangkong puting pahina | Tingnan kung ang PHP version ay 8.1+ sa cPanel → Select PHP Version |
| "Failed to connect" error | I-verify na umiiral ang .env na may tamang database credentials |
| CORS error sa browser | Siguraduhing ang CORS_ORIGIN sa .env ay eksaktong tumutugma sa iyong domain |
| 500 Internal Server Error | Tingnan ang cPanel → Error Log; i-verify ang DB credentials |
| Hindi nag-a-upload ang mga larawan | Tingnan kung ang uploads/ folder permissions ay 755 |
| Lumang content pagkatapos mag-update | Hard refresh: Ctrl + Shift + R |
Kailangan ng Tulong?
Makipag-ugnayan sa HSEBox support gamit ang:
Iyong domain URL · Error message o screenshot · PHP version mula sa cPanel
HSEBox Sunucu Kurulum Kılavuzu
📋 Başlamadan Önce — Minimum Gereksinimler
Hosting hizmetiniz aşağıdaki gereksinimleri karşılamalıdır:
| Gereksinim | Minimum | Önerilen |
|---|---|---|
| Hosting türü | cPanel paylaşımlı hosting veya Apache sunucu | SSH erişimli cPanel |
| PHP sürümü | 8.1 | 8.2 veya 8.3 |
| PHP eklentileri | pdo_mysql, json, mbstring, mail | (genellikle önceden yüklü) |
| Veritabanı | MySQL 5.7+ veya MariaDB 10.3+ | MySQL 8.0+ veya MariaDB 10.4+ |
| Web sunucusu | Apache 2.4+ ile mod_rewrite | — |
| SSL/HTTPS | Gerekli | — |
| Disk alanı | 50 MB (uygulama dosyaları) | 500 MB+ (yüklemeler için) |
1 Veritabanını Oluşturun
- cPanel kontrol panelinize giriş yapın
- MySQL Databases bölümüne gidin
- Yeni bir veritabanı oluşturun (örn.
youruser_hsebox) - Güçlü bir parola ile yeni bir veritabanı kullanıcısı oluşturun (harf, rakam ve sembol karışımı — en az 16 karakter)
- Add User to Database seçeneğine tıklayın ve ALL PRIVILEGES yetkisi verin
• Veritabanı adı • Veritabanı kullanıcı adı • Veritabanı parolası
2 Uygulama Dosyalarını Yükleyin
- Tüm uygulama dosyalarını içeren
HSEBox Web APP.zipadlı bir klasör alacaksınız - cPanel → File Manager bölümünü açın (veya FTP/SFTP ile bağlanın)
- HSEBox'ı kurmak istediğiniz konuma gidin:
- Ana alan adı:
public_html/dizinine gidin - Alt klasör:
public_html/klasor-adiniz/dizinine gidin - Alt alan adı: ilgili alt alan adının belge kök dizinine gidin
- Ana alan adı:
- Üretim klasöründeki tüm dosya ve klasörleri seçtiğiniz dizine yükleyin
Yükleme sonrası sunucu dizininiz şunları içermelidir:
3 Klasör İzinlerini Ayarlayın
uploads/ klasörünün yazılabilir olması gerekir, böylece kullanıcılar fotoğraf ve belge yükleyebilir.
- cPanel → File Manager bölümünde
uploads/klasörüne sağ tıklayın - Change Permissions seçeneğine tıklayın
- 755 olarak ayarlayın (Sahip: Okuma/Yazma/Çalıştırma, Grup: Okuma/Çalıştırma, Genel: Okuma/Çalıştırma)
- Bu ayarın
uploads/içindeki tüm alt klasörlere uygulandığından emin olun
Alternatif olarak, SSH ile:
4 Yapılandırma Dosyasını Oluşturun
- Sunucu dizininizde
env.exampleadlı dosyayı bulun - Bu dosyayı kopyalayın ve kopyasını
.envolarak yeniden adlandırın (başındaki noktaya dikkat edin) .envdosyasını düzenleme için açın ve değerlerinizi girin:
Herhangi bir çevrimiçi rastgele dize oluşturucuya gidin, harf, rakam ve sembollerden oluşan en az 64 karakterlik bir dize oluşturun ve JWT_SECRET değeri olarak yapıştırın. Bu, her kurulum için benzersiz olmalıdır.
•
CORS_ORIGIN ve APP_URL, https:// dahil tam alan adınız olmalıdır — sonunda eğik çizgi olmadan• Cloudflare veya ters proxy arkasındaysanız,
TRUST_PROXY=1 olarak ayarlayın5 Veritabanını İçe Aktarın
- cPanel → phpMyAdmin bölümüne gidin
- Sol kenar çubuğundan veritabanınızı seçin
- Üst kısımdaki Import sekmesine tıklayın
- Üç dosyayı tam olarak bu sırayla içe aktarın:
Dosya 1: schema.sql — Tüm veritabanı tablolarını oluşturur
Dosya 2: Tercih ettiğiniz dil için seed dosyası:
| Language | File |
|---|---|
| English | seed_en.sql |
| Arabic | seed_ar.sql |
| German | seed_de.sql |
| Spanish | seed_es.sql |
| Filipino | seed_fil.sql |
| French | seed_fr.sql |
| Hindi | seed_hi.sql |
| Italian | seed_it.sql |
| Portuguese | seed_pt.sql |
| Turkish | seed_tr.sql |
| Urdu | seed_ur.sql |
Dosya 3: Aynı dil için checklist seed dosyası: seed_checklist_XX.sql
6 Alt Klasör Yapılandırması (yalnızca gerekirse)
HSEBox bir alan adının kök dizinine kurulduysa (örn. https://hsebox.yourcompany.com) bu adımı atlayın.
Bir alt klasöre kurduysanız (örn. https://yourcompany.com/hsebox/):
.htaccessdosyasını düzenleme için açın- Dosyanın üst kısmında (yaklaşık 7. satır) şu satırı bulun:
# işaretini kaldırın ve klasör adınızı yazın:
Dosyayı kaydedin.
7 İlk Erişim ve Kurulum
- Tarayıcınızı açın ve HSEBox URL'nize gidin (örn.
https://yourdomain.com) - İlk erişimde Kurulum Sihirbazı otomatik olarak görünecektir
- Sihirbazı takip ederek şunları yapın:
- Şirket adınızı ve bilgilerinizi girin
- Şirket logonuzu yükleyin (isteğe bağlı)
- Yönetici hesabını oluşturun (e-posta + parola)
- Lisans aktivasyon anahtarınızı girin
- Tamamlandığında yönetici olarak giriş yapmış olacaksınız
• Ek kullanıcılar oluşturun (Ayarlar → Kullanıcı Yönetimi)
• Proje alanlarını yapılandırın
• HSE modüllerini kullanmaya başlayın
8 Her Şeyin Çalıştığını Doğrulayın
Kurulumdan sonra şu hızlı kontrolleri yapın:
| Kontrol | Ne yapmalı | Beklenen sonuç |
|---|---|---|
| Sağlık kontrolü | /health adresini ziyaret edin | { "status": "ok", "db": true, "jwt": true } |
| Güvenlik kontrolü | /.env adresini ziyaret edin | 403 Forbidden hatası (bu doğrudur) |
| Giriş | Yönetici hesabıyla giriş yapın | Tüm modüllere tam erişim |
🧹 Temizlik (İsteğe Bağlı)
Başarılı kurulumdan sonra bu dosyaları sunucudan güvenle silebilirsiniz:
schema.sqlseed_*.sql(tüm seed dosyaları)seed_checklist_*.sql(tüm checklist seed dosyaları)env.example
.htaccess tarafından korunmaktadır, bu nedenle tarayıcı üzerinden erişilemezler, ancak kaldırmak iyi bir uygulamadır.🔧 Sorun Giderme
| Sorun | Çözüm |
|---|---|
| Boş beyaz sayfa | cPanel → Select PHP Version bölümünden PHP sürümünün 8.1+ olduğunu kontrol edin |
| "Failed to connect" hatası | .env dosyasının doğru veritabanı bilgileriyle var olduğunu doğrulayın |
| Tarayıcıda CORS hatası | .env dosyasındaki CORS_ORIGIN değerinin tam alan adınızla eşleştiğinden emin olun |
| 500 Internal Server Error | cPanel → Error Log bölümünü kontrol edin; veritabanı bilgilerini doğrulayın |
| Fotoğraflar yüklenmiyor | uploads/ klasör izinlerinin 755 olduğunu kontrol edin |
| Güncellemeden sonra eski içerik | Sayfayı zorla yenileyin: Ctrl + Shift + R |
Yardıma İhtiyacınız Var mı?
HSEBox destek ile iletişime geçin:
Alan adı URL'niz · Hata mesajı veya ekran görüntüsü · cPanel'deki PHP sürümü
HSEBox سرور انسٹالیشن گائیڈ
📋 شروع کرنے سے پہلے — کم از کم ضروریات
آپ کی ہوسٹنگ کو ان ضروریات کو پورا کرنا ضروری ہے:
| ضرورت | کم از کم | تجویز کردہ |
|---|---|---|
| ہوسٹنگ کی قسم | cPanel شیئرڈ ہوسٹنگ یا Apache سرور | SSH رسائی کے ساتھ cPanel |
| PHP ورژن | 8.1 | 8.2 یا 8.3 |
| PHP ایکسٹینشنز | pdo_mysql, json, mbstring, mail | (عام طور پر پہلے سے انسٹال) |
| ڈیٹابیس | MySQL 5.7+ یا MariaDB 10.3+ | MySQL 8.0+ یا MariaDB 10.4+ |
| ویب سرور | Apache 2.4+ مع mod_rewrite | — |
| SSL/HTTPS | ضروری | — |
| ڈسک اسپیس | 50 MB (ایپ فائلز) | 500 MB+ (اپ لوڈز کے لیے) |
1 ڈیٹابیس بنائیں
- اپنے cPanel کنٹرول پینل میں لاگ ان کریں
- MySQL Databases پر جائیں
- ایک نیا ڈیٹابیس بنائیں (مثلاً
youruser_hsebox) - ایک مضبوط پاس ورڈ کے ساتھ نیا ڈیٹابیس صارف بنائیں (حروف، نمبرز اور علامات کا مرکب — کم از کم 16 حروف)
- Add User to Database پر کلک کریں اور ALL PRIVILEGES دیں
• ڈیٹابیس کا نام • ڈیٹابیس صارف نام • ڈیٹابیس پاس ورڈ
2 ایپلیکیشن فائلز اپ لوڈ کریں
- آپ کو
HSEBox Web APP.zipنامی فولڈر ملے گا جس میں تمام ایپلیکیشن فائلز ہوں گی - cPanel → File Manager کھولیں (یا FTP/SFTP سے جڑیں)
- اس جگہ جائیں جہاں آپ HSEBox انسٹال کرنا چاہتے ہیں:
- مرکزی ڈومین:
public_html/پر جائیں - سب فولڈر:
public_html/your-folder-name/پر جائیں - سب ڈومین: اس سب ڈومین کی ڈاکیومنٹ روٹ پر جائیں
- مرکزی ڈومین:
- پروڈکشن فولڈر سے تمام فائلز اور فولڈرز اپنی منتخب ڈائریکٹری میں اپ لوڈ کریں
اپ لوڈ کے بعد، آپ کی سرور ڈائریکٹری میں یہ ہونا چاہیے:
3 فولڈر پرمیشنز سیٹ کریں
uploads/ فولڈر کو قابل تحریر ہونا ضروری ہے تاکہ صارفین تصاویر اور دستاویزات اپ لوڈ کر سکیں۔
- cPanel → File Manager میں
uploads/فولڈر پر رائٹ کلک کریں - Change Permissions پر کلک کریں
- 755 سیٹ کریں (مالک: پڑھنا/لکھنا/چلانا، گروپ: پڑھنا/چلانا، عوام: پڑھنا/چلانا)
- یقینی بنائیں کہ یہ
uploads/کے اندر تمام سب فولڈرز پر لاگو ہو
متبادل طور پر، SSH کے ذریعے:
4 کنفیگریشن فائل بنائیں
- اپنی سرور ڈائریکٹری میں
env.exampleنامی فائل تلاش کریں - اس کی کاپی بنائیں اور کاپی کا نام
.envرکھیں (شروع میں نقطے پر دھیان دیں) .envفائل کو ایڈٹنگ کے لیے کھولیں اور اپنی اقدار درج کریں:
کسی بھی آن لائن رینڈم سٹرنگ جنریٹر پر جائیں، حروف، نمبرز اور علامات کے ساتھ کم از کم 64 حروف کی سٹرنگ بنائیں اور JWT_SECRET کی قدر کے طور پر پیسٹ کریں۔ یہ ہر انسٹالیشن کے لیے منفرد ہونا ضروری ہے۔
•
CORS_ORIGIN اور APP_URL آپ کا عین مطابق ڈومین ہونا چاہیے بشمول https:// — آخر میں سلیش نہیں• اگر Cloudflare یا ریورس پراکسی کے پیچھے ہیں تو
TRUST_PROXY=1 سیٹ کریں5 ڈیٹابیس امپورٹ کریں
- cPanel → phpMyAdmin پر جائیں
- بائیں سائیڈبار سے اپنا ڈیٹابیس منتخب کریں
- اوپر Import ٹیب پر کلک کریں
- تین فائلیں بالکل اسی ترتیب سے امپورٹ کریں:
فائل 1: schema.sql — تمام ڈیٹابیس ٹیبلز بناتی ہے
فائل 2: اپنی پسندیدہ زبان کے لیے سیڈ فائل:
| Language | File |
|---|---|
| English | seed_en.sql |
| Arabic | seed_ar.sql |
| German | seed_de.sql |
| Spanish | seed_es.sql |
| Filipino | seed_fil.sql |
| French | seed_fr.sql |
| Hindi | seed_hi.sql |
| Italian | seed_it.sql |
| Portuguese | seed_pt.sql |
| Turkish | seed_tr.sql |
| Urdu | seed_ur.sql |
فائل 3: اسی زبان کے لیے چیک لسٹ سیڈ فائل: seed_checklist_XX.sql
6 سب فولڈر کنفیگریشن (صرف اگر ضرورت ہو)
اگر HSEBox کسی ڈومین کی روٹ پر انسٹال ہے (مثلاً https://hsebox.yourcompany.com) تو یہ مرحلہ چھوڑ دیں۔
اگر آپ نے اسے سب فولڈر میں انسٹال کیا ہے (مثلاً https://yourcompany.com/hsebox/):
.htaccessفائل کو ایڈٹنگ کے لیے کھولیں- فائل کے اوپری حصے میں (تقریباً لائن 7 کے قریب) یہ لائن تلاش کریں:
# ہٹائیں اور اپنے فولڈر کا نام لکھیں:
فائل محفوظ کریں۔
7 پہلی رسائی اور سیٹ اپ
- اپنا براؤزر کھولیں اور اپنے HSEBox URL پر جائیں (مثلاً
https://yourdomain.com) - پہلی رسائی پر سیٹ اپ وزرڈ خود بخود ظاہر ہوگا
- وزرڈ کی پیروی کریں:
- اپنی کمپنی کا نام اور تفصیلات درج کریں
- اپنی کمپنی کا لوگو اپ لوڈ کریں (اختیاری)
- ایڈمنسٹریٹر اکاؤنٹ بنائیں (ای میل + پاس ورڈ)
- اپنی لائسنس ایکٹیویشن کی درج کریں
- مکمل ہونے پر، آپ ایڈمنسٹریٹر کے طور پر لاگ ان ہو جائیں گے
• اضافی صارفین بنائیں (سیٹنگز → صارف مینجمنٹ)
• پراجیکٹ ایریاز کنفیگر کریں
• HSE ماڈیولز استعمال شروع کریں
8 تصدیق کریں کہ سب کچھ کام کرتا ہے
سیٹ اپ کے بعد یہ فوری جانچ کریں:
| جانچ | کیا کریں | متوقع نتیجہ |
|---|---|---|
| ہیلتھ چیک | /health وزٹ کریں | { "status": "ok", "db": true, "jwt": true } |
| سیکیورٹی چیک | /.env وزٹ کریں | 403 Forbidden ایرر (یہ درست ہے) |
| لاگ ان | ایڈمن اکاؤنٹ سے لاگ ان کریں | تمام ماڈیولز تک مکمل رسائی |
🧹 صفائی (اختیاری)
کامیاب انسٹالیشن کے بعد آپ یہ فائلز سرور سے محفوظ طریقے سے حذف کر سکتے ہیں:
schema.sqlseed_*.sql(تمام سیڈ فائلز)seed_checklist_*.sql(تمام چیک لسٹ سیڈ فائلز)env.example
.htaccess سے محفوظ ہیں اس لیے براؤزر سے قابل رسائی نہیں ہیں، لیکن انہیں ہٹانا اچھا عمل ہے۔🔧 مسائل کا حل
| مسئلہ | حل |
|---|---|
| خالی سفید صفحہ | cPanel → Select PHP Version میں PHP ورژن 8.1+ ہونے کی تصدیق کریں |
| "Failed to connect" ایرر | تصدیق کریں کہ .env درست ڈیٹابیس اسناد کے ساتھ موجود ہے |
| براؤزر میں CORS ایرر | یقینی بنائیں کہ .env میں CORS_ORIGIN آپ کے عین مطابق ڈومین سے میل کھاتا ہے |
| 500 Internal Server Error | cPanel → Error Log چیک کریں؛ ڈیٹابیس اسناد کی تصدیق کریں |
| تصاویر اپ لوڈ نہیں ہو رہیں | uploads/ فولڈر کی پرمیشنز 755 ہونے کی تصدیق کریں |
| اپ ڈیٹ کے بعد پرانا مواد | زبردستی ریفریش کریں: Ctrl + Shift + R |
مدد چاہیے؟
HSEBox سپورٹ سے رابطہ کریں:
آپ کا ڈومین URL · ایرر میسج یا اسکرین شاٹ · cPanel سے PHP ورژن
Head Office: Rua Quinta d'Arca, Lot B9, Lower Level, Chainça – Abrantes, 2200-172 Abrantes, Portugal - Europe.
HSEBox and Mastery Hub Academy™
are registered trademarks of HSEBox Technologies, Lda.
We proudly offer our services and training programs worldwide.